If you are really striving to be a professional, and be a mature respectable artist in the music industry, you need to *be* responsible and professional. If you're planning on making a living at producing, you need to take the less exciting parts just as seriously as the "fun", and creative parts. Being a musician/producer/artist professionally means treating the source of your income as important! If disaster strikes at seemingly the worst time possible, you might get hurt in several ways.
There's the obvious potential loss of your time and effort, the loss of real property, but there are other losses that can hurt you professionally: potential loss of income, loss of respect & not being taken seriously, and loss of opportunity.
Pretty serious, huh?
Let's look at it. Let's say things are *really* looking up for you, you've been working for a couple months on some great tracks. You have just a bit more to do: you've put all the finishing touches on three tracks last night at 11:00 PM, and have an appointment at a top-tier studio in town today at 4:00 PM to have them mastered. Maybe you've got some time booked for a really respected engineer to do a mixdown of one of 'em.
You're going to meet an A&R rep there at 6:00 and go have dinner, she really wants to hear your latest stuff as she's heard great things about you and heard your older tracks--and want's to check out the new stuff. If it's as good as you hope, maybe they'll sign you.
This is a really big day, even beyond that, because a really popular DJ asked you if he could spin a couple of your latest tracks at a hot club tonight. Tons of people will be there. The DJ wants to meet with you at 9:00 PM before the club opens and pick a couple of the new tracks with you. He might even ask you to get up and do some live performance if you're both into it!
So, here at 9:00 AM you grab your laptop and get ready to throw it in the car for a ride to Starbucks. A guy on a moped runs up to you, grabs the backpack, knocks you down, and speeds off! How screwed are you? You don't have to be. Or did you lose everything?
Think about this scenario for a minute. You've only got a few hours. What do you do? If you didn't already have a backup & emergency recovery strategy in place, you've probably lost some or all of your latest work, and have *no way* to be ready in time for your appointments today. If you can't get *everything* back in just a few hours, you're going to let everybody down, including yourself. And that studio's going to charge you for the time, even if you show up empty handed--you didn't cancel your appointment 48 hours in advance.
Did your latest tweaks of your project files get backed up last night? How about the mixdowns you did over the last couple of weeks? Do you have the latest ones? How about the DAW and plugin software? How are you gonna get that back on there? Serial numbers? Is it all gone?
Here's how to have this day still work out fine! Really? Yes:
So, we need to do backups with several "levels" available for recovery. Doing this correctly speeds up the recovery process and gives you flexibility in case, as in the scenario above, you need to just do a few things quickly and easily, but *be able* to recover everything.
OK so the first thing: as a professional, *invest in the tools and resources*. In IT we've got the concept of tiers of availability. For our purposes here just think about it like this: the files you worked on today, the files you worked on or changed this week, and "everything" including a full restore of your system, say, no older than one month. Or you updated it more recently if you made big changes like installed a new DAW. Treat the strategy as "disaster recovery" as well as just "backup".
You want to have a "completely recoverable" image to get your computer up and running again without having to re-install every program, patch, update, and register or unlock 'em with serial numbers. You additionally should have a way to restore just a subset of the files, but not the whole system, and not require install of the backup software. Sometimes you want just a pile of your recent files. You also want to have really fast access to very recent versions of the latest files you were working on, as the full restore takes significantly more time and you might be in a situation where a system to recover to isn't available as quickly.
Consider this: you may want several gigs of files, but the Internet at the hotel downtown where you're staying and at the local Starbucks just isn't that fast. You can only get a few smaller files that way.
If your house was broken into or burned down, would you lose that full system image as well as your "pile of files"? We can see that we need a solution for this as well. That's why in IT we consider *off-site* storage of backups so important for disaster recovery.
Here's the system that will save you. You've got a full system backup on a hard drive in an external enclosure, and it's either in a storage space you rent or maybe at another trusted location, perhaps your parents or a (trusted) friend's house.
You go get this once a month and do your full system backup, perhaps while you visit your family or friend.
In your house, you've got an external drive with just your project files and media files associated with 'em that you've worked on *since* the last full backup. If this drive is big enough, you could keep a copy of *all* of them on it. You back this one up once a week (or more often). I've got mine in a little *fireproof safe* in my studio.
You also use a cloud backup service (or *more than one*) and back up your latest work *every* night. For good measure, copy the few files you're planning to use tomorrow up to Dropbox as well.
So, now you're ready.
1. Call your friend/family, and see if they can meet you or bring the full system restore drive to you. It might be a cloned drive of your system drive and a full backup of your program and data drive. This stuff is in a little box or bag all together with whatever cables you might need. So, say they can do it, and if they meet you halfway it's 30 minutes drive for each of you. They'll meet you in an hour and a half. If you're really serious about this later in your career, you could have this sent to you by courier or overnighted if you're on tour (after you make the big time).
2. What are you gonna do with that backup when you get it? On the way, you go to the big-box store and buy a laptop. (You *do* have a credit card with enough available credit, or cash in an emergency savings account, right? And after this emergency is over, you're going to get a check from your insurance company. You *do* have an insurance policy for the stolen laptop, right?)
3. Even if these first two steps make you nervous because of the tight schedule, you do have a little security. You put your external drive with the week's "pile of files" in the *safe at the hotel*. So if you run into a technical glitch with the new laptop, you've still got the week's work available.
4. Last night's edits and "finishing touches to the mix" before mastering are available via your cloud backup. Yeah, this meant you had to have the laptop running overnight or have done the sync before bed--but you did it. Worst case you'll have yesterday's .wav files you created even if you for some reason can't load the project files that are up there too.
5. You get the laptop and the backup media, and get started on the restore. It's around 10:30 when you get started. Oh, wow, looks like that full restore is going to take about four hours!...but that's OK, it's 2:30 when we're done with the restore, and we'll see that we'll be done in time to drive over to the studio and make our 4:00 PM appointment easily!
6. Our backup finished, and we grab the portable drive from the hotel safe, hook it up to the laptop, and copy those files to the laptop. Then we connect to the cloud backup service through the hotel's "slow" internet. It takes about 30 minutes for all this, but we've copied all our work up through last week, and we download the most recent work up to and including our last-minute work yesterday and last night. Now we are in the *same state* we were in before the disaster struck! And it's 3:00, plenty of time to make it to the studio even with traffic. Put the restore media *and* the external drive with this week's files *back* in the hotel safe.
7. At the studio, we've got everything we need on this new laptop, we've got everything we're gonna need for our dinner with the label rep, and we're ready for tonight's gig with the DJ! If the label rep says she thinks you should make a couple of track changes and come by the office at the end of the week, you don't have to say "um...these mixes are all I've got, the projects are all gone."
If you're doing lots of work, or are really paranoid, there's nothing wrong with a faster "cycle", where you do a full system backup/image once a week, backup all data files nightly, and sync changes to your working files up to the cloud once an hour.
In conclusion: External storage is cheap. Cloud backup is cheap. Backup software is cheap. You haven't lost all your hard work, you don't end up looking like you shouldn't be taken seriously by other professionals, and you aren't missing out on your opportunities! You want to be a professional? Plan and operate like a professional. If you think you can't "afford" this relatively small expense and the time and effort, then you've decided that you *can* afford to lose everything, or close to it.
The peace of mind a properly executed strategy like this provides counts for a lot.
Saturday, May 25, 2013
Saturday, May 18, 2013
Getting the Kick You Want: Do You Even Layer?
In this article we’re going to talk about kick drum samples, and specifically the seemingly constant suggestion to “layer your kicks”. There are a lot of statements made in the EDM community that sound smart, seem to have consensus, and appear to be describing a specific technique to achieve a goal, but the name is a deceptively simple one. Once you’ve heard something that sounds straightforward again and again, you might just assume it’s the right thing to do, or to always do. Simply “layering” sounds can make a weaker sound and require additional work to get a quality result. Let’s look at this common suggestion to “layer your kicks”. This comes from statements made by some artists, observation of producers in how-to videos, and then some conclusions drawn by generalizing the concept without always understanding the details. Producers just trying various kicks and layering them might end up getting a good sound, so they don’t think about it too much.
Such a broad (and vague) statement using just the word “layer” is where I want to help. A word that broad seems to have an obvious application isn’t the best way to communicate this method, in my opinion. If a beginner doesn’t understand what’s happening at a low level then the result sounding better (or not) is just going to be random chance, and we’ll see why. We all want to accomplish the same thing: get a great kick drum sound. Possibly we want to get a unique sound, or we may want to create a sound like we hear from a particular artist, but we just don’t have a sample that’s quite right.
We are going to examine some layering techniques and show what actually happens. Then we will see how you can improve on that to get the sound you want, and avoid potential problems. We’ll use specifics rather than just generalizations. We’ll show you how to avoid going about this randomly and just hoping for the best. You’re just going to be frustrated if you spend time with layering and then find out your kick isn’t powerful, has a weird tone you don’t want, and have no clear idea why. Then you might spend a lot more time messing around more and more with the resulting sound via additional layers, tweaking the EQ, compression, normalization, etc. and end up with something that turns out okay, but just isn’t great. That time and effort didn’t pay off. Let’s look at it. Here’s the first kick:
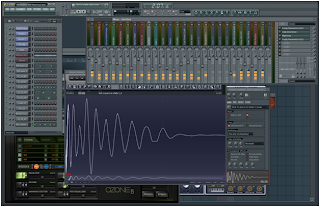
 It’s got a boom, with a nice tone. It sounds like this.
However, there’s not a complex transient with some high frequencies, so there’s not a prominent “click” or “thwack” from a kick pedal. We see also that the frequency gets lower as the sound decays. Notably, the attack of the kick doesn’t have an attack with a much higher amplitude than the body of the sound in this kick--the first few cycles are already at the maximum amplitude. It looks like we’ve had some high compression or limiting on the peaks; they’re “squared off” a bit, without being clipped. So perhaps we like this kick, but we wish it had a sharper and more prominent attack. Here’s Kick 2. Check out that attack:
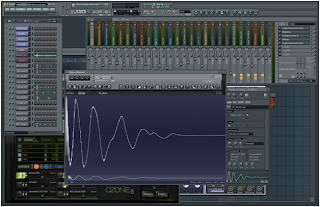
Lots of high frequency information, all very early in the sound.
[soundcloud url="http://api.soundcloud.com/tracks/92758486" params="" width=" 100%" height="166" iframe="true" /]
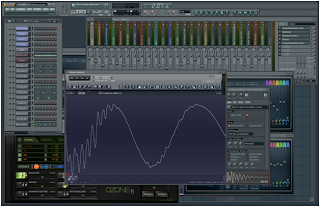
Maybe this will sound good combined with kick number 1. But, look what happens when we simply EQ them each to taste then play them together & freeze the result to layer them:
[soundcloud url="http://api.soundcloud.com/tracks/92758488" params="" width=" 100%" height="166" iframe="true" /] Might not be what you expected...
Notice that the shape of the waveform changes. Along with losing the roundness of the first kick’s waveform almost entirely and ending up with a more squashed-sawtooth-type wave, something else happens: look at how the amplitude is lower across almost the whole sample (except for one cycle)! We might happen to like the timbre of this kick, but we’ve lost quite a bit of the power, and it no longer has the same tone and envelope of the original kick. Clearly we’ll need to do some sound shaping, perhaps by applying some compression to it. That first kick was nicely compressed and limited already, so now we’ve made a bit more work for ourselves.
Here’s another potential problem area that might not be obvious: notice that the in the first kick sample, the wave has a negative amplitude (it goes “down” the graph to start the first cycle), but the 2nd kick’s attack is positive, (the wave form goes in the positive direction from the start of the sample). This tells us right away that we’re going to get some destructive interference. We could get interference even if the polarity of the samples was the same but they were out of phase. This is something to always look for. There’s also a second problem that isn’t immediately apparent—until you zoom in.
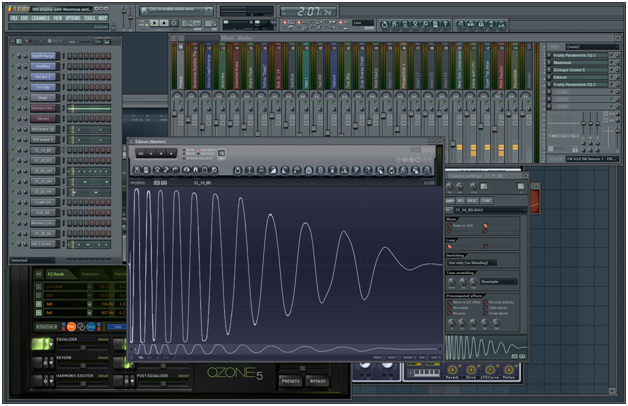
 Look, our merged sample start point isn’t on a zero crossing! Yikes. This sample is “trying” to pull the speaker in instantly at the start of the playback. Our speaker can’t pull back infinitely quickly…
Fortunately that’s pretty easy to fix in the sample editor. This one (Edison) has a “de-click” feature. Just select that area right at the start of the sample and choose “Declick in” from the Tools menu. Here’s the corrected waveform, now starting at a zero crossing:
Look, our merged sample start point isn’t on a zero crossing! Yikes. This sample is “trying” to pull the speaker in instantly at the start of the playback. Our speaker can’t pull back infinitely quickly…
Fortunately that’s pretty easy to fix in the sample editor. This one (Edison) has a “de-click” feature. Just select that area right at the start of the sample and choose “Declick in” from the Tools menu. Here’s the corrected waveform, now starting at a zero crossing:
 The main take-away from that discussion that I want to impress on you is that simply layering or stacking kicks on top of each other without awareness of what’s happening with the combined waveform can have unexpected results. Just expecting to get a better kick sound by using more than one kick is pretty much random chance.
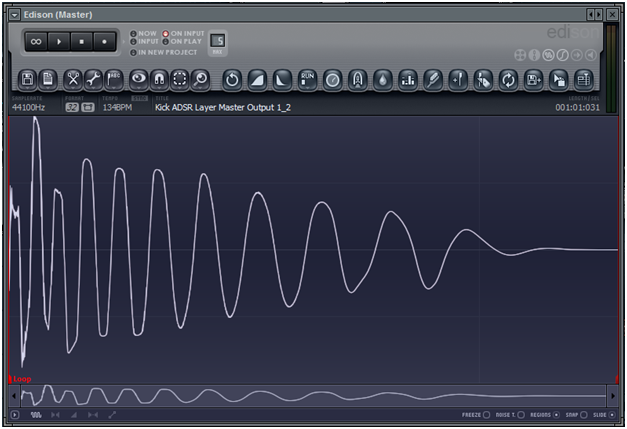
Here’s what the final output on the master buss looks like after I added some compression, saturation and EQ to the layered sample.
The main take-away from that discussion that I want to impress on you is that simply layering or stacking kicks on top of each other without awareness of what’s happening with the combined waveform can have unexpected results. Just expecting to get a better kick sound by using more than one kick is pretty much random chance.
Here’s what the final output on the master buss looks like after I added some compression, saturation and EQ to the layered sample.
 It turns out I actually like the sound of this kick pretty well. The thing to note is that it wound up sounding good by accident—it doesn’t actually have simply the attack from one and the body from the other. I’ve always been an experimental artist, so I’ve got nothing against exploring and working this way—so long as you’re aware that’s what you’re doing.

So we have to add another filter (or another pole to the first filter) to remove this peak:

Here’s what we might come up with as output from the high-pass & low-pass EQ when we apply it to both kicks:

We need to remember that this peak will happen with a high-Q filter, and without using a 2nd filter we will add to the frequencies right at the low-pass slope. This will end up creating some of that interference that we’re trying to avoid in the first place! But even though our steep slope may drop at 12 dB per octave, frequencies near the cross-over point of our low and high passes can still have enough amplitude to interfere. A sound half as loud (-6 dB) half an octave a way can still sum with another that’s half as loud from the other sound. Now we’ve got a point in the combined waveform that still might either end up cancelling 100%, or have the same amplitude as a point in the original sound. We can still end up with the wrong pitch from phase or polarity problems.
For example a kick with an 80 Hz fundamental may have an audible harmonic an octave higher at 160 Hz. Say we don’t want that as there’s too much ~100 Hz in the other kick, with plenty of energy still up at 160 Hz. Let’s say the kicks have the same polarity and are close in phase. If our high and low pass on each sample had a slope of *only 6 dB* per octave that would leave us with that frequency half as loud in each sample: when summed, the sound at that frequency would be just about as loud as in one or the other of our original samples! We need to be sure that we use a slope of 12 or even 24 dB per octave if we really want to isolate the frequencies from just the attack of one kick and the body from another.
We had those nice steep slopes for our low and high pass filters, so this turned out pretty well, but it still doesn’t quite have that “click” in the attack that we wanted.

Sounds like this.[soundcloud url="http://api.soundcloud.com/tracks/92758747" params="" width=" 100%" height="166" iframe="true" /]
You might already have a mental image of what we’re going to be doing here. We want to have an instantaneous (full volume) attack time with a steep decay & very low sustain and release for the kick that has the attack we want, and a slower (but still quick) attack for the kick with the body we want, and a decay, sustain, and release that matches the waveform of the other kick. That might look something like this:

And for the attack:

And here’s the result:

[soundcloud url="http://api.soundcloud.com/tracks/92758487" params="" width=" 100%" height="166" iframe="true" /]
That’s a pretty interesting kick too, with a slightly different result; there’s a bit more click and punch at the beginning. That high-amplitude cycle that’s louder than the rest of the sound can be sorted out with compression with a quick attack & a quick release and/or make-up gain for the if we want to. It’s still not quite right, though. We’ve still got problems from the waveforms adding amplitude and reducing it via constructive and destructive interference. So we haven’t eliminated that with this method. You can combine the ADSR volume envelope with a filter envelope too. And of course you can use EQ along with the ADSR technique. Make changes and tweaks, then render or freeze the sample and check it to see what works best for a particular combination or set of kick samples.

https://soundcloud.com/leechifer/2-kicks-layered-sample-editor?in=leechifer/sets/kick-layering-method-examples [soundcloud url="http://api.soundcloud.com/tracks/92758489" params="" width=" 100%" height="166" iframe="true" /]
Aha! This technique created exactly what we *said* we wanted: the attack from one kick, and the body of another! There wasn’t any layering, multi-tracking, or stacking of our kick sounds involved. We didn’t have to render the two playing together. We used our sample editor to load two samples, sliced them and stitched the two slices together.
“Layering” sounds really is a *distinct* and different technique for sound creation and may not be your first choice if you want to avoid dealing with the complications we’ve described. If you just want the attack of one kick and the body of another then sample editing is the straightforward and most accurate method to preserve the timbre of each source. And remember, it might be faster to just run through your sample library. Don’t feel you *have* to hand craft every single drum sample! But if you prefer that hand-crafted sound, go for it! Synthesizing your own kick is another method we don't discuss here. There are good resources out there you can find via Google on how to generate an entirely synthesized kick. For some styles using a synth kick works *really* well. You can tune the body of the synthesized kick without affecting the attack.
Here’s what all of the kicks look like, side by side:

Here are the source samples and the results of the various methods on Soundcloud.
Remember, do whatever works for you and what you like best. If it sounds the way you want, use it. You’re the artist.
Such a broad (and vague) statement using just the word “layer” is where I want to help. A word that broad seems to have an obvious application isn’t the best way to communicate this method, in my opinion. If a beginner doesn’t understand what’s happening at a low level then the result sounding better (or not) is just going to be random chance, and we’ll see why. We all want to accomplish the same thing: get a great kick drum sound. Possibly we want to get a unique sound, or we may want to create a sound like we hear from a particular artist, but we just don’t have a sample that’s quite right.
We are going to examine some layering techniques and show what actually happens. Then we will see how you can improve on that to get the sound you want, and avoid potential problems. We’ll use specifics rather than just generalizations. We’ll show you how to avoid going about this randomly and just hoping for the best. You’re just going to be frustrated if you spend time with layering and then find out your kick isn’t powerful, has a weird tone you don’t want, and have no clear idea why. Then you might spend a lot more time messing around more and more with the resulting sound via additional layers, tweaking the EQ, compression, normalization, etc. and end up with something that turns out okay, but just isn’t great. That time and effort didn’t pay off. Let’s look at it. Here’s the first kick:
 It’s got a boom, with a nice tone. It sounds like this.
However, there’s not a complex transient with some high frequencies, so there’s not a prominent “click” or “thwack” from a kick pedal. We see also that the frequency gets lower as the sound decays. Notably, the attack of the kick doesn’t have an attack with a much higher amplitude than the body of the sound in this kick--the first few cycles are already at the maximum amplitude. It looks like we’ve had some high compression or limiting on the peaks; they’re “squared off” a bit, without being clipped. So perhaps we like this kick, but we wish it had a sharper and more prominent attack. Here’s Kick 2. Check out that attack:

Lots of high frequency information, all very early in the sound.
[soundcloud url="http://api.soundcloud.com/tracks/92758486" params="" width=" 100%" height="166" iframe="true" /]
Maybe this will sound good combined with kick number 1. But, look what happens when we simply EQ them each to taste then play them together & freeze the result to layer them:

[soundcloud url="http://api.soundcloud.com/tracks/92758488" params="" width=" 100%" height="166" iframe="true" /] Might not be what you expected...
Notice that the shape of the waveform changes. Along with losing the roundness of the first kick’s waveform almost entirely and ending up with a more squashed-sawtooth-type wave, something else happens: look at how the amplitude is lower across almost the whole sample (except for one cycle)! We might happen to like the timbre of this kick, but we’ve lost quite a bit of the power, and it no longer has the same tone and envelope of the original kick. Clearly we’ll need to do some sound shaping, perhaps by applying some compression to it. That first kick was nicely compressed and limited already, so now we’ve made a bit more work for ourselves.
Here’s another potential problem area that might not be obvious: notice that the in the first kick sample, the wave has a negative amplitude (it goes “down” the graph to start the first cycle), but the 2nd kick’s attack is positive, (the wave form goes in the positive direction from the start of the sample). This tells us right away that we’re going to get some destructive interference. We could get interference even if the polarity of the samples was the same but they were out of phase. This is something to always look for. There’s also a second problem that isn’t immediately apparent—until you zoom in.
 Look, our merged sample start point isn’t on a zero crossing! Yikes. This sample is “trying” to pull the speaker in instantly at the start of the playback. Our speaker can’t pull back infinitely quickly…
Fortunately that’s pretty easy to fix in the sample editor. This one (Edison) has a “de-click” feature. Just select that area right at the start of the sample and choose “Declick in” from the Tools menu. Here’s the corrected waveform, now starting at a zero crossing:
Look, our merged sample start point isn’t on a zero crossing! Yikes. This sample is “trying” to pull the speaker in instantly at the start of the playback. Our speaker can’t pull back infinitely quickly…
Fortunately that’s pretty easy to fix in the sample editor. This one (Edison) has a “de-click” feature. Just select that area right at the start of the sample and choose “Declick in” from the Tools menu. Here’s the corrected waveform, now starting at a zero crossing: The main take-away from that discussion that I want to impress on you is that simply layering or stacking kicks on top of each other without awareness of what’s happening with the combined waveform can have unexpected results. Just expecting to get a better kick sound by using more than one kick is pretty much random chance.
Here’s what the final output on the master buss looks like after I added some compression, saturation and EQ to the layered sample.
The main take-away from that discussion that I want to impress on you is that simply layering or stacking kicks on top of each other without awareness of what’s happening with the combined waveform can have unexpected results. Just expecting to get a better kick sound by using more than one kick is pretty much random chance.
Here’s what the final output on the master buss looks like after I added some compression, saturation and EQ to the layered sample.  It turns out I actually like the sound of this kick pretty well. The thing to note is that it wound up sounding good by accident—it doesn’t actually have simply the attack from one and the body from the other. I’ve always been an experimental artist, so I’ve got nothing against exploring and working this way—so long as you’re aware that’s what you’re doing.
 Can We Do Better?
So how can we improve on this and have more control over the results? We really just wanted the body from kick one and the attack from kick two, right? Some of you are thinking: “no one who knows what they’re doing does it the way you just described; you’ve got to ‘use EQ’” during the initial layering. Yep, you may have heard you can just use EQ and high-pass the attack of the one sound, and low pass the body of the other. Well, it’s likely going to take more than just a simple application of EQ with it high-passed on one and low-passed on another. Here’s why: Your EQ will have a certain maximum “slope” it can apply, described in dB per octave. Analog circuits have limits based on the capabilities of their circuitry. Your plugins will also have limits based on the mathematical formulas they apply, and also because the plugin probably wants to provide a “natural” sound which matches what you’d expect to hear in a physical unit. Also, extremely abrupt filtering provided by “brute force” math (almost always) doesn’t sound good. There are plenty of articles describing EQ simulation and digital filters & signal processing in depth. What does this addition of EQ shaping mean for our layering? Even a steep EQ or filter will have a limit in the change in can make per octave without also introducing its own consequences to the sound. Here’s what a single pole low pass filter will look like:
So we have to add another filter (or another pole to the first filter) to remove this peak:

Here’s what we might come up with as output from the high-pass & low-pass EQ when we apply it to both kicks:

We need to remember that this peak will happen with a high-Q filter, and without using a 2nd filter we will add to the frequencies right at the low-pass slope. This will end up creating some of that interference that we’re trying to avoid in the first place! But even though our steep slope may drop at 12 dB per octave, frequencies near the cross-over point of our low and high passes can still have enough amplitude to interfere. A sound half as loud (-6 dB) half an octave a way can still sum with another that’s half as loud from the other sound. Now we’ve got a point in the combined waveform that still might either end up cancelling 100%, or have the same amplitude as a point in the original sound. We can still end up with the wrong pitch from phase or polarity problems.
For example a kick with an 80 Hz fundamental may have an audible harmonic an octave higher at 160 Hz. Say we don’t want that as there’s too much ~100 Hz in the other kick, with plenty of energy still up at 160 Hz. Let’s say the kicks have the same polarity and are close in phase. If our high and low pass on each sample had a slope of *only 6 dB* per octave that would leave us with that frequency half as loud in each sample: when summed, the sound at that frequency would be just about as loud as in one or the other of our original samples! We need to be sure that we use a slope of 12 or even 24 dB per octave if we really want to isolate the frequencies from just the attack of one kick and the body from another.
We had those nice steep slopes for our low and high pass filters, so this turned out pretty well, but it still doesn’t quite have that “click” in the attack that we wanted.

Sounds like this.[soundcloud url="http://api.soundcloud.com/tracks/92758747" params="" width=" 100%" height="166" iframe="true" /]
Are There Other Ways?
What else can we do? There are two other options for this sort of sound design—and we’ll see later that we might combine one or more of them. Instead of the frequency filtering we can manipulate the volume envelope of each sample. The attack, decay, sustain and release (ADSR) of the volume of a sound will be configurable in your sampler. Note that for additional control some samplers allow for more than just these four stages of the envelope (like an attack, decay 1, rise, sustain, decay 2, and release). The sampler also almost always supports filtering of the frequencies of the samples over time. For this example we only need a simple volume envelope.You might already have a mental image of what we’re going to be doing here. We want to have an instantaneous (full volume) attack time with a steep decay & very low sustain and release for the kick that has the attack we want, and a slower (but still quick) attack for the kick with the body we want, and a decay, sustain, and release that matches the waveform of the other kick. That might look something like this:

And for the attack:

And here’s the result:
[soundcloud url="http://api.soundcloud.com/tracks/92758487" params="" width=" 100%" height="166" iframe="true" /]
That’s a pretty interesting kick too, with a slightly different result; there’s a bit more click and punch at the beginning. That high-amplitude cycle that’s louder than the rest of the sound can be sorted out with compression with a quick attack & a quick release and/or make-up gain for the if we want to. It’s still not quite right, though. We’ve still got problems from the waveforms adding amplitude and reducing it via constructive and destructive interference. So we haven’t eliminated that with this method. You can combine the ADSR volume envelope with a filter envelope too. And of course you can use EQ along with the ADSR technique. Make changes and tweaks, then render or freeze the sample and check it to see what works best for a particular combination or set of kick samples.
“Assuming Direct Control”
Our next option to combine these kicks is manually editing the files together in a sample editor, where we surgically take the attack from one sample and cut and paste it in place of the attack from the other sample. This leaves the realm of “layering” and now we’re really doing sound design via sample editing. The sounds aren’t “mixed” with this technique; we’re replacing the attack section of our body kick with a different waveform. When we’re editing samples this way we want to be sure that our two samples meet at a zero crossing. The sample editor may have a feature to do this for us, but it’s best to verify this; zoom in, line them up, and be precise. We also want to check the polarity of each sample and may need or want to reverse one, to avoid an “M” or “W” shape at our transition point.
https://soundcloud.com/leechifer/2-kicks-layered-sample-editor?in=leechifer/sets/kick-layering-method-examples [soundcloud url="http://api.soundcloud.com/tracks/92758489" params="" width=" 100%" height="166" iframe="true" /]
Aha! This technique created exactly what we *said* we wanted: the attack from one kick, and the body of another! There wasn’t any layering, multi-tracking, or stacking of our kick sounds involved. We didn’t have to render the two playing together. We used our sample editor to load two samples, sliced them and stitched the two slices together.
“Layering” sounds really is a *distinct* and different technique for sound creation and may not be your first choice if you want to avoid dealing with the complications we’ve described. If you just want the attack of one kick and the body of another then sample editing is the straightforward and most accurate method to preserve the timbre of each source. And remember, it might be faster to just run through your sample library. Don’t feel you *have* to hand craft every single drum sample! But if you prefer that hand-crafted sound, go for it! Synthesizing your own kick is another method we don't discuss here. There are good resources out there you can find via Google on how to generate an entirely synthesized kick. For some styles using a synth kick works *really* well. You can tune the body of the synthesized kick without affecting the attack.
Here’s what all of the kicks look like, side by side:

Here are the source samples and the results of the various methods on Soundcloud.
Remember, do whatever works for you and what you like best. If it sounds the way you want, use it. You’re the artist.
Subscribe to:
Comments (Atom)
